Growing Vegetables from Kitchen Scraps

Growing Vegetables from Kitchen Scraps

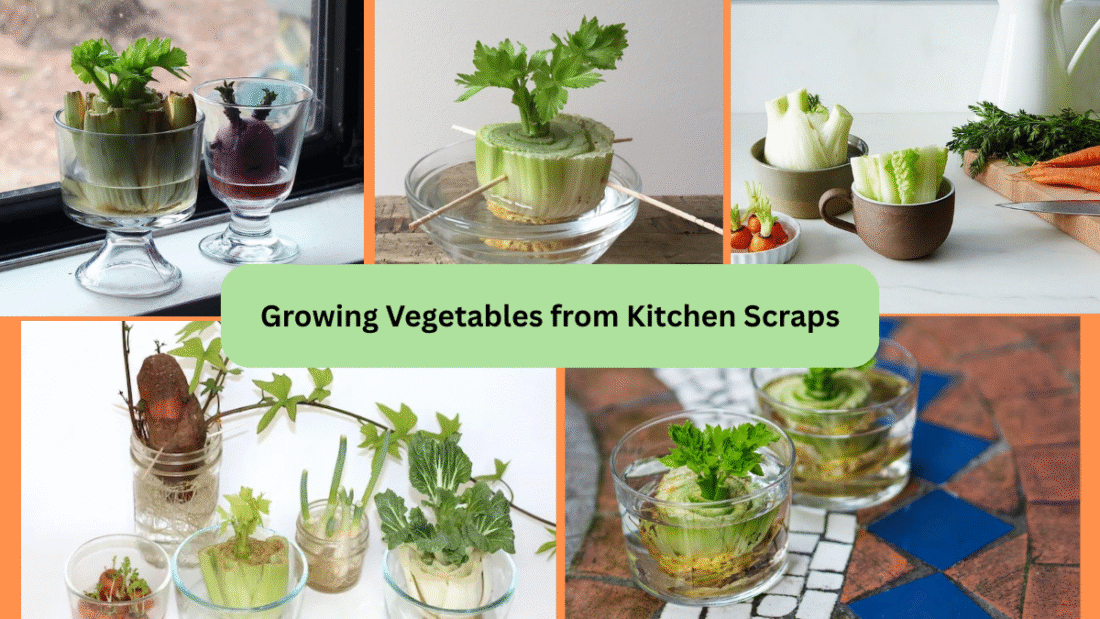
Did you know you can turn your everyday kitchen scraps into fresh, homegrown vegetables? Growing vegetables from kitchen scraps is not only a fun and cost-effective way to reduce food waste, but it’s also an ideal project for beginner gardeners, families, and anyone looking to live a little greener.

This sustainable gardening technique allows you to regrow vegetable plants from leftover stems, roots, and leaves that you’d typically throw away. Many common kitchen ingredients — like green onions, lettuce, potatoes, and garlic — can be revived in water or soil with minimal effort.

In this detailed guide, we’ll explain which vegetables you can grow from scraps, how to regrow them step-by-step, and helpful tips to keep your scrap garden thriving indoors or outdoors.


Why Grow Vegetables from Kitchen Scraps?

Growing from scraps offers several benefits:

  • Reduces kitchen waste and supports sustainable living.
  • Saves money by extending the life of store-bought produce.
  • Requires minimal space and resources. Great for apartments, balconies, or sunny kitchen windowsills.
  • Provides a fun, hands-on gardening activity for kids and beginners.
  • Gives you access to fresh, organic vegetables without chemicals or pesticides.

Best of all, it requires no fancy equipment — just water, a few containers, and your leftover vegetable scraps.


10 Common Vegetables You Can Grow from Kitchen Scraps

Let’s dive into some popular vegetables you can easily regrow at home from kitchen scraps.


1. Green Onions (Scallions)

How to Grow:

  • Save the white root ends of green onions (about 1–2 inches long).
  • Place them root-side down in a glass of water.
  • Keep on a sunny windowsill and change the water every 2–3 days.
  • New green shoots will appear within a week.
  • Once tall enough, snip the greens for use in recipes.

Tip: You can keep regrowing from the same base multiple times.


2. Lettuce

How to Grow:

  • Save the base of a lettuce head (about 1–2 inches from the bottom).
  • Place it in a shallow dish of water with the cut side facing up.
  • Change the water daily and keep it in a sunny spot.
  • New leaves will sprout from the center in 5–7 days.
  • Transfer to soil once roots develop for a larger harvest.
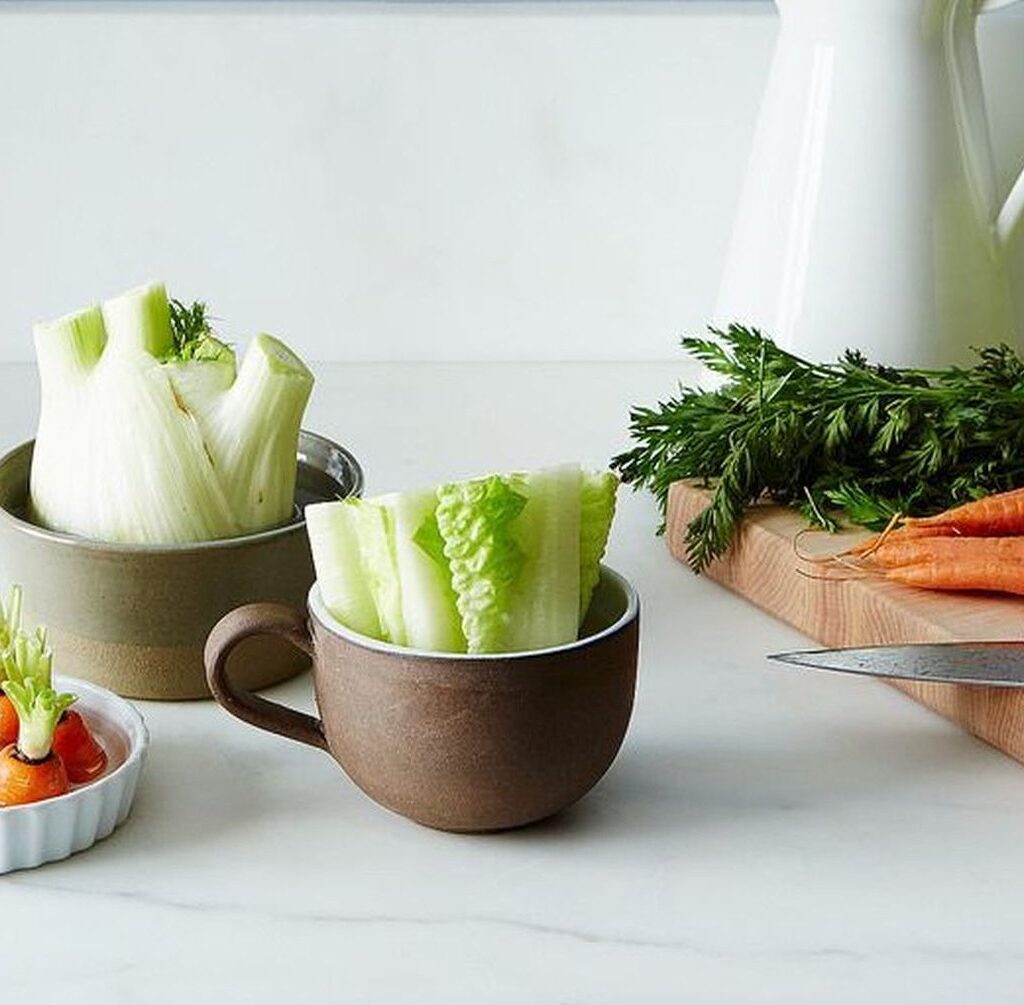
3. Carrot Greens

How to Grow:

  • Cut off the top 1 inch of a carrot (with the leafy greens, if possible).
  • Place the cut side down in a shallow dish of water.
  • New carrot greens will sprout from the top.
  • While you won’t regrow carrots this way, the leafy greens are edible and great for salads and garnishes.

4. Garlic

How to Grow:

  • Save large, healthy garlic cloves.
  • Plant them root-side down in well-draining soil.
  • Keep the soil moist but not soggy.
  • Green garlic shoots will emerge within a week.
  • You can use the green tops in cooking, and with time, the bulb will regrow underground.

5. Potatoes

How to Grow:

  • Cut a potato into chunks with at least one “eye” (sprouting bud) per piece.
  • Let them dry for a day to prevent rotting.
  • Plant the pieces in soil with the eye facing up.
  • Keep the soil loose and well-drained.
  • In a few weeks, green shoots will appear above ground, and potatoes will develop underground over several months.

6. Basil

How to Grow:

  • Save a basil stem about 4–5 inches long with a few leaves at the top.
  • Place it in a glass of water, removing lower leaves.
  • Change water every 2 days and keep it in bright, indirect sunlight.
  • Roots will form within a week.
  • Once roots are 2 inches long, plant it in soil.
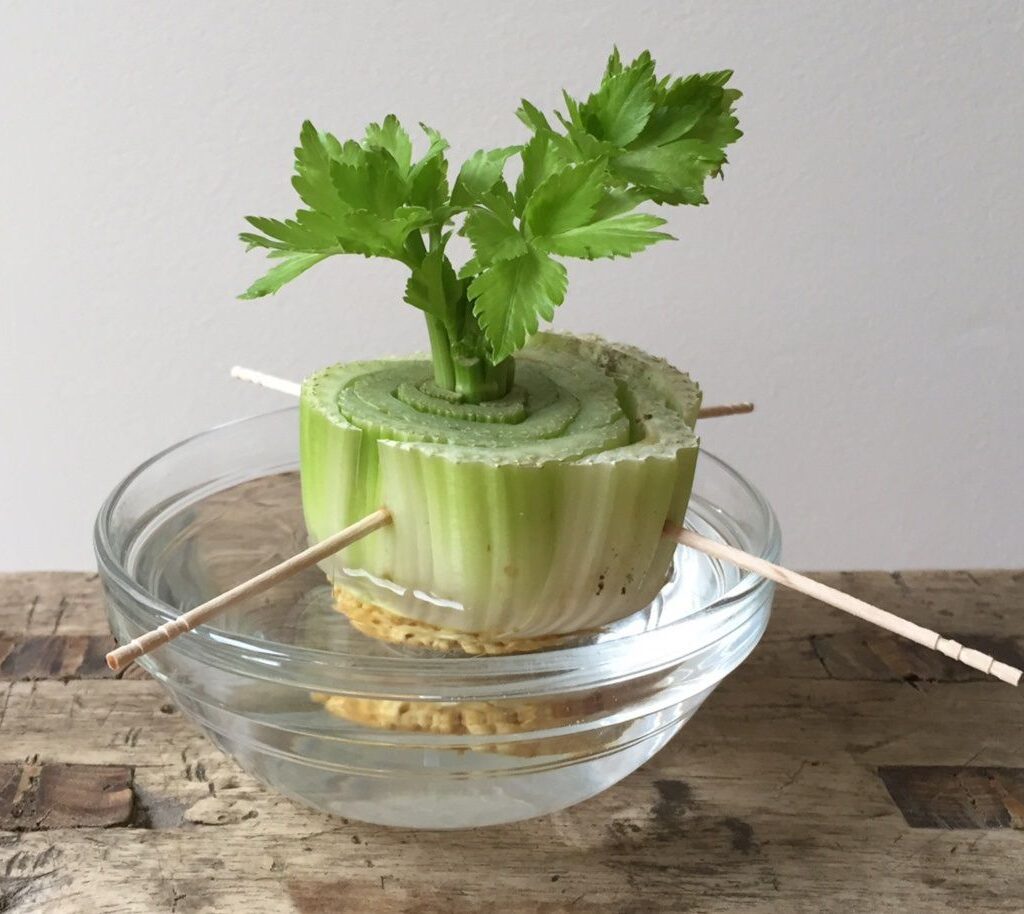
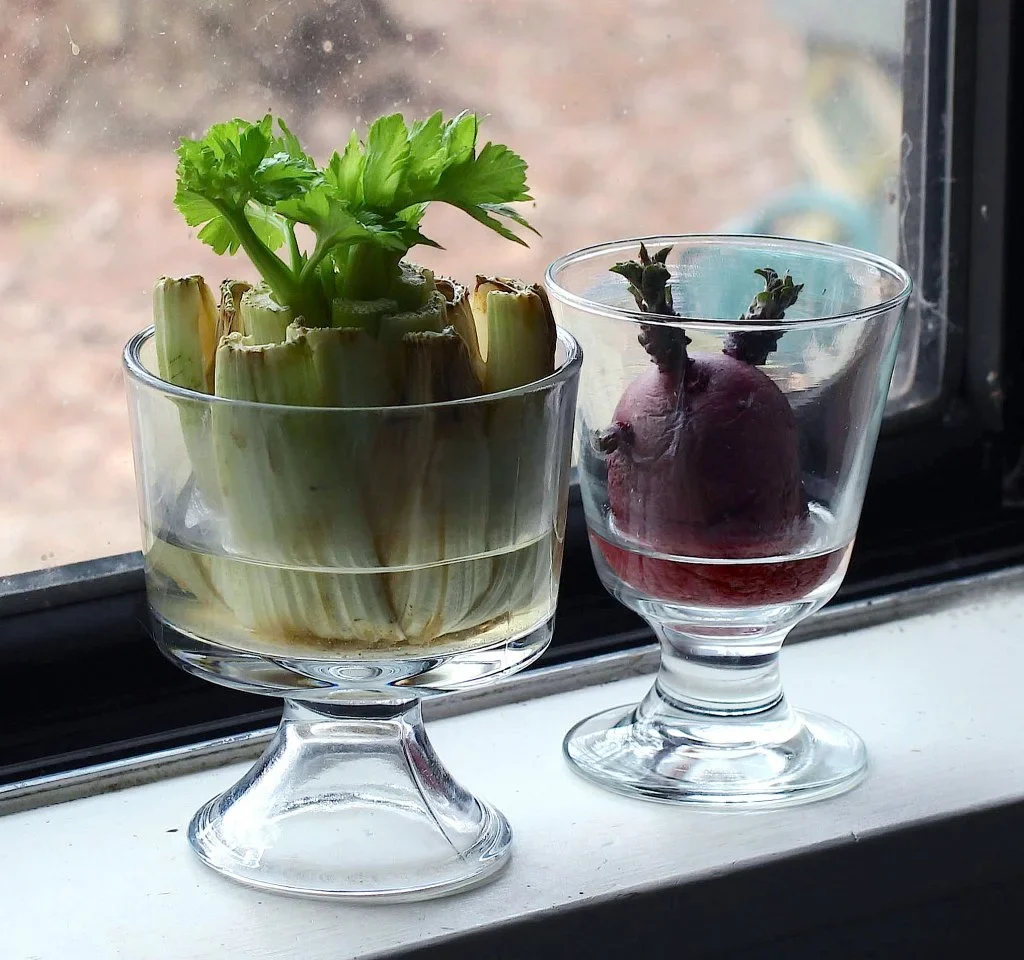
7. Celery

How to Grow:

  • Cut about 2 inches from the base of a celery stalk.
  • Place the base in a shallow bowl of water.
  • Keep in a bright, sunny spot and change the water regularly.
  • New leaves and shoots will grow from the center within a week.
  • Transplant to soil once roots appear.

8. Leeks

How to Grow:

  • Similar to green onions, save the white root ends.
  • Place in a glass of water, root side down.
  • Change water every couple of days.
  • New growth will sprout quickly.
  • Can be continually harvested by cutting the greens.

9. Bok Choy

How to Grow:

  • Cut about 2 inches from the base of a bok choy head.
  • Set in a shallow dish of water with cut side facing up.
  • Place on a sunny windowsill.
  • New leaves and roots will develop within a week.
  • Move to soil for a fuller plant.
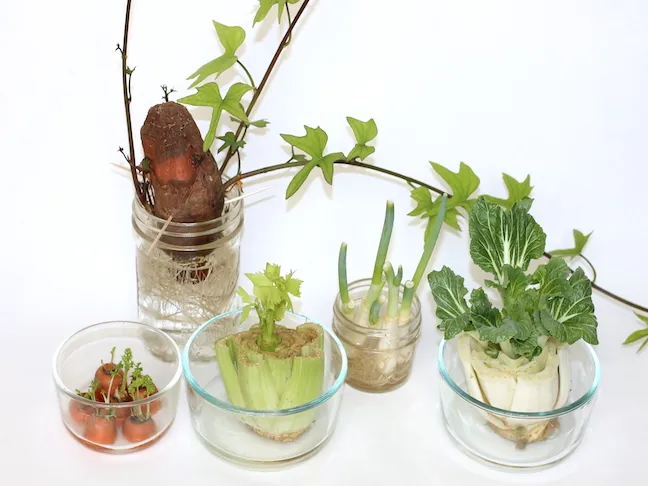
10. Sweet Potatoes

How to Grow:

  • Cut a sweet potato in half.
  • Suspend half in a glass of water using toothpicks.
  • In about 2 weeks, sprouts (called “slips”) will appear.
  • When the slips are 5–6 inches long, twist them off and plant in soil.

General Tips for Growing Vegetables from Scraps

  • Provide plenty of sunlight: Most kitchen scrap veggies thrive on sunny windowsills or balconies with 4–6 hours of light daily.
  • Change water regularly: Prevent mold and bacteria by changing the water every 2–3 days.
  • Use clean containers: Rinse jars and dishes before use.
  • Transition to soil for bigger harvests: Many vegetables like lettuce, celery, and potatoes do best when transferred to soil once roots form.
  • Avoid using chlorinated tap water: Let tap water sit out overnight or use filtered water to avoid chemicals that hinder growth.

Benefits of a Kitchen Scrap Garden

  1. Eco-friendly: Reduces household food waste.
  2. Budget-friendly: Cuts down grocery bills by regenerating fresh herbs and veggies.
  3. Sustainable: Promotes a zero-waste, green lifestyle.
  4. Educational: Great way to teach kids about plant biology and sustainability.
  5. Low-maintenance: Requires little space, time, or gardening experience.

Final Thoughts

Growing vegetables from kitchen scraps is a rewarding, eco-conscious, and surprisingly easy way to start your own mini garden at home. Whether you’re in a small apartment or a spacious house, you can regrow fresh greens, herbs, and veggies with items you’d typically throw away.

By learning how to regrow kitchen scraps, you not only reduce waste and save money but also cultivate a deeper appreciation for the life cycle of plants. With a little patience, sunlight, and care, you’ll soon enjoy a kitchen scrap garden bursting with fresh, homegrown flavors.

How to Grow High Oxygen Plants for Better Sleep

How to Grow High Oxygen Plants for Better Sleep

In today’s fast-paced, stressful world, getting quality sleep is more important than ever. While many people rely on blackout curtains, white noise machines, or aromatherapy to improve their rest, one of the most natural and overlooked solutions is adding high oxygen-producing plants to your bedroom.

Certain indoor plants don’t just beautify your space — they actively purify the air and release oxygen at night, improving the quality of your breathing, reducing stress, and promoting deeper, more restful sleep. In this guide, you’ll learn which high oxygen plants to grow, how to care for them, and tips to create a healthier, greener sleeping space.


Why High Oxygen Plants Improve Sleep

Most plants photosynthesize by absorbing carbon dioxide and releasing oxygen during the day. However, some unique species, known as CAM (Crassulacean Acid Metabolism) plants, continue producing oxygen at night. When placed in your bedroom, these plants can:

  • Increase oxygen levels
  • Filter harmful airborne toxins (like formaldehyde, benzene, and trichloroethylene)
  • Improve humidity
  • Reduce stress and anxiety
  • Create a serene, relaxing environment

These natural benefits lead to better breathing, deeper sleep, and improved overall well-being.


Top High Oxygen Plants to Grow for Better Sleep

Let’s start by exploring some of the best plants that release oxygen at night and are ideal for bedrooms.

1. Snake Plant (Sansevieria)

  • One of the most popular oxygen-producing houseplants.
  • Releases oxygen at night while removing toxins like benzene and formaldehyde.
  • Extremely low-maintenance and drought-tolerant.

Care Tip:
Thrives in low to bright indirect light. Water every 2–4 weeks, letting soil dry completely.


2. Areca Palm

  • A lush, elegant palm that acts as a natural humidifier.
  • Continuously produces oxygen while filtering indoor air.
  • Adds tropical vibes to your bedroom.

Care Tip:
Prefers bright, indirect light and consistently moist (but not soggy) soil.


3. Aloe Vera

  • Known for its medicinal gel, aloe also purifies the air and emits oxygen at night.
  • Absorbs harmful chemicals from household products.

Care Tip:
Needs bright, indirect light and infrequent watering. Let soil dry out between waterings.


4. Peace Lily

  • Beautiful, flowering plant that removes toxins while releasing oxygen.
  • Increases room humidity, which soothes dry skin and respiratory issues.

Care Tip:
Prefers low to medium indirect light and moist soil. Keep away from direct sunlight.


5. Tulsi (Holy Basil)

  • Sacred in Ayurveda for its healing properties and air-purifying benefits.
  • Releases oxygen continuously while absorbing carbon dioxide and harmful gases.

Care Tip:
Needs 4–6 hours of sunlight daily and moderately moist soil.


6. Gerbera Daisy

  • Produces high oxygen levels at night and eliminates benzene.
  • Bright, cheerful blooms make them perfect for bedside tables.

Care Tip:
Needs bright, indirect sunlight and evenly moist, well-draining soil.


How to Grow High Oxygen Plants Successfully

Now that you know which plants to grow, here’s how to care for them effectively so they thrive indoors.


Light Requirements

Most oxygen-producing plants thrive in bright, indirect sunlight.

  • Place near east- or west-facing windows.
  • Avoid placing directly in harsh afternoon sun, which can scorch leaves.
  • For low-light plants (like snake plants or peace lilies), corners with filtered light or shaded spots work fine.

Pro Tip:
Rotate plants every 2 weeks to encourage even growth.


Watering Guidelines

Golden rule: Avoid overwatering — it’s the quickest way to harm indoor plants.

  • Check soil moisture by inserting a finger 1–2 inches deep.
  • Water only when the top layer feels dry.
  • Reduce watering in winter as plants grow slower.

Signs of overwatering:
Yellow, mushy leaves, root rot, and foul-smelling soil.

Signs of underwatering:
Crisp, curling, or drooping leaves.

Pro Tip:
Use room-temperature, chlorine-free water when possible.


Ideal Soil Mix

Use a well-draining, loose potting mix for your high oxygen plants to prevent soggy roots.

Best options:

  • Cactus or succulent mix for snake plants and aloe vera.
  • Peat moss-based mix for palms and peace lilies.
  • Add perlite or sand to improve drainage.

Pro Tip:
Check the pot’s drainage holes to avoid water accumulation at the bottom.


Temperature and Humidity

Most indoor oxygen plants prefer:

  • Temperature: 60°F to 85°F (15°C to 29°C)
  • Humidity: Moderate to high (especially for peace lilies and areca palms)

Pro Tip:
Use a small humidifier in dry bedrooms or mist plants occasionally in summer.


Fertilizing Tips

Feed your plants during their active growing season (spring and summer):

  • Use a balanced liquid houseplant fertilizer diluted to half strength.
  • Fertilize once a month for flowering and fast-growing plants.
  • Reduce or stop feeding during fall and winter.

Arranging Your Bedroom Plant Space

For maximum impact:

  • Place plants on your bedside table, windowsill, or dresser.
  • Avoid cluttering your sleeping area — 2–3 well-chosen plants can transform air quality.
  • Use attractive pots to complement your bedroom decor.
  • Keep taller plants (like areca palms) near corners or windows.

Benefits Beyond Better Sleep

In addition to promoting restful sleep, high oxygen plants:

  • Enhance concentration and mood
  • Relieve stress and anxiety
  • Balance indoor humidity
  • Purify air from harmful chemicals and allergens
  • Add natural beauty and a serene vibe to any space

Bonus:
Some studies, including NASA’s famous Clean Air Study, found that plants like snake plants, peace lilies, and areca palms significantly reduce indoor air pollutants.


Common Mistakes to Avoid

  1. Overwatering:
    Let soil dry between waterings — soggy soil causes root rot.
  2. Placing in dark corners:
    Even low-light plants need indirect light for healthy photosynthesis.
  3. Using poorly draining soil:
    Always use loose, well-draining potting mixes.
  4. Ignoring humidity needs:
    Dry air harms tropical plants. Mist regularly or use a humidifier.
  5. Too many plants in a small space:
    Overcrowding can block airflow and light, leading to pest problems.

Final Thoughts

Growing high oxygen plants in your bedroom is one of the simplest, most natural ways to improve your sleep quality and overall well-being. From low-maintenance snake plants to lush areca palms, these beautiful plants not only freshen the air but create a calming, restorative atmosphere for restful nights.

By following this guide’s light, soil, and watering tips, even beginners can successfully cultivate a small, oxygen-boosting bedroom jungle that works silently while you sleep.

So why wait? Bring home a few of these air-purifying champions, set them by your bed, and start enjoying better, healthier sleep tonight!

Avocado Plant Care 101: From Pit to Tree

Avocado Plant Care 101: From Pit to Tree

The avocado — creamy, nutrient-packed, and beloved for everything from guacamole to toast toppings. But beyond the kitchen, did you know you can grow your very own avocado plant right at home? Whether you’re aiming for a lush indoor houseplant or dreaming of someday harvesting homegrown fruit, growing an avocado tree from a pit is a simple and satisfying project.

In this comprehensive guide, we’ll take you through every step of avocado plant care — from saving a pit to nurturing it into a beautiful tree. Even if it never bears fruit, you’ll enjoy the process of growing this tropical beauty in your home.


Why Grow an Avocado Plant?

Besides the obvious charm of growing your own plant from kitchen scraps, avocado trees offer:

  • Beautiful ornamental foliage: Lush, glossy green leaves brighten any room.
  • A beginner-friendly gardening project: Simple materials, no fancy tools required.
  • An educational experience: Perfect for kids and first-time gardeners.
  • A potential long-term harvest: Though it takes years, with the right care, some indoor avocado trees can eventually bear fruit.

Supplies You’ll Need

Before you begin, gather these basic items:

  • 1 ripe avocado pit
  • 4 toothpicks
  • 1 clear glass or jar
  • Fresh, clean water
  • Potting soil (light, well-draining)
  • A small plant pot with drainage holes
  • A sunny windowsill or grow light

Step-by-Step: How to Grow an Avocado Plant


Step 1: Remove and Clean the Pit

After enjoying your avocado:

  • Gently remove the pit without cutting it.
  • Rinse under lukewarm water, removing any remaining flesh.
  • Pat dry with a soft towel.

Leave the pit’s brown skin intact — it protects the seed during germination.


Step 2: Identify Top and Bottom

  • Top (pointy end): Where the stem will sprout.
  • Bottom (flat end): Where roots will grow.

Correct positioning is crucial for successful sprouting.


Step 3: Insert Toothpicks

Stick 4 toothpicks into the seed’s middle, evenly spaced and slightly angled downwards.
This setup suspends the pit above water, keeping the bottom submerged while the top stays dry.


Step 4: Suspend in Water

  • Fill a glass or jar with fresh water.
  • Suspend the pit over the glass using the toothpicks.
  • Ensure only the bottom half is submerged.

Place it in a warm, bright spot with indirect sunlight.


Step 5: Maintain and Wait

  • Change the water every 2–3 days.
  • Keep the water level consistent.
  • Germination typically takes 2–8 weeks.

Watch for:

  1. Outer skin drying and cracking.
  2. Roots sprouting from the bottom.
  3. A stem emerging from the top.

Tip: If no growth occurs after 8 weeks, try with a fresh pit.


Potting Your Sprouted Avocado Seed

When the stem reaches 6–8 inches and roots are 3–4 inches long:

  • Remove the toothpicks and plant the seed in a pot filled with moist, well-draining potting mix.
  • Keep the top half of the pit exposed above soil level.
  • Place the pot in a bright, warm location.

Avocado Plant Care Basics

Once your avocado seedling is potted, proper care ensures healthy growth and, eventually, a thriving tree.


Light

Avocado plants love bright, indirect sunlight.

  • Place near a south- or west-facing window.
  • Avoid direct, midday sunlight to prevent leaf scorch.
  • Use a grow light if natural light is limited.

Watering

  • Water thoroughly when the top inch of soil feels dry.
  • Avoid overwatering; roots are sensitive to soggy conditions.
  • In winter, reduce watering as growth slows.

Tip: Brown leaf tips often indicate underwatering or dry indoor air.


Humidity

Avocado plants prefer moderate humidity.

  • Mist leaves occasionally, especially in dry climates or during winter.
  • Use a humidity tray or room humidifier if needed.

Temperature

Optimal temperature: 65–85°F (18–29°C).
Protect your plant from drafts, air conditioners, and temperatures below 50°F (10°C).


Fertilizing

Feed monthly during the growing season (spring and summer) with a balanced, water-soluble fertilizer (10-10-10 NPK).
Skip fertilizing in fall and winter when the plant enters dormancy.


Pruning and Shaping

To promote bushy, attractive growth:

  • Pinch off the top leaves when the plant reaches 8–10 inches tall.
  • Trim leggy, weak, or overcrowded branches.
  • Remove any dead or yellowing leaves.

Pruning encourages lateral branching, making the plant fuller and sturdier.


When (and If) It Will Fruit

Growing fruit on an indoor avocado plant is possible but rare for seed-grown plants.
Key points:

  • It can take 5–10 years (or longer) for a seed-grown plant to flower and potentially produce fruit.
  • Indoor conditions must mimic tropical environments: bright light, warmth, and humidity.
  • Hand-pollination may be needed since avocados have unique flowering cycles where flowers open as male and female at different times.

For better fruiting potential indoors:

  • Consider buying a grafted dwarf variety like ‘Wurtz’ or ‘Little Cado’ from a nursery.
    These produce fruit faster and stay compact for indoor settings.

Common Issues and How to Solve Them

ProblemCauseSolution
Yellow leavesOverwateringLet soil dry between waterings; ensure drainage
Brown leaf tipsDry air, underwatering, salt buildupMist leaves; adjust watering; flush soil occasionally
No sprouting seedOld or damaged seed, incorrect placementUse a fresh pit; ensure proper top/bottom orientation
Root rotExcess water, poor drainageImprove drainage; repot in fresh, well-draining soil
Drooping leavesTemperature shock, drafts, or overwateringMove to a sheltered spot; monitor watering habits

Fun Avocado Plant Facts

  • Avocado trees are native to Central and South America.
  • The word “avocado” comes from the Aztec word “ahuacatl”, which also meant “testicle,” referencing the fruit’s shape.
  • In ideal conditions, avocado trees can grow up to 60 feet tall outdoors — though indoor plants stay much smaller.
  • Even without fruit, avocado plants purify air and add tropical beauty to indoor spaces.

Final Thoughts

Growing an avocado plant from pit to tree is a rewarding, low-cost project perfect for gardeners of all levels. While fruit may take years and ideal indoor conditions are tricky to replicate, the journey itself is full of charm and satisfaction.

By following proper care — from water and light management to pruning and fertilizing — you can nurture a thriving avocado plant that adds beauty and life to your home. Even without a harvest, you’ll enjoy the lush greenery and the pleasure of growing something from your kitchen scraps.

So next time you slice open an avocado, save that pit and start your own plant-growing adventure!

How to Grow Ginger in Containers: A Complete Beginner’s Guide

How to Grow Ginger in Containers: A Complete Beginner’s Guide

Fresh, aromatic, and packed with health benefits — ginger (Zingiber officinale) is a kitchen staple loved worldwide for its spicy flavor and medicinal properties. While traditionally cultivated in tropical fields, the good news is that you don’t need acres of land to enjoy homegrown ginger. Ginger thrives beautifully in containers, making it perfect for balconies, patios, windowsills, and small urban spaces.

If you’re new to gardening or limited on space, growing ginger in containers is surprisingly simple and incredibly rewarding. In this complete guide, you’ll learn everything you need to know about how to grow ginger in containers — from selecting the right rhizomes to planting, care, and harvesting.


Why Grow Ginger in Containers?

Growing ginger in pots offers a host of advantages:

  • Space-saving: Ideal for small patios, balconies, and windowsills.
  • Portable: Move pots indoors during colder months.
  • Controlled Environment: Easier to manage soil quality, moisture, and light.
  • Fewer Pests & Diseases: Container-grown plants are typically less susceptible to soil-borne problems.
  • Fresh, Chemical-Free Ginger: Harvest tender, organic ginger whenever you need it.

What You’ll Need

Before planting, gather the following:

  • Fresh ginger root (preferably organic)
  • A wide, shallow container with drainage holes (minimum 12 inches deep and wide)
  • Well-draining potting mix
  • Organic compost or aged manure
  • Watering can or hose with a gentle nozzle
  • Mulch (optional)

Step-by-Step: How to Grow Ginger in Containers


Step 1: Choose Healthy Ginger Rhizomes

Look for:

  • Firm, plump ginger roots
  • Smooth skin with visible ‘eyes’ or growth buds
  • Avoid shriveled or moldy pieces

Tip: Organic ginger is ideal since conventionally grown ones may be treated with growth inhibitors.


Step 2: Prepare the Ginger Pieces

  • Cut large ginger roots into 1-2 inch chunks, ensuring each has at least one visible growth bud.
  • Allow cut pieces to air-dry in a shaded area for 24-48 hours. This prevents rot when planted.

Step 3: Select the Right Container

Ginger grows horizontally, so choose a wide, shallow container at least 12 inches deep and wide with good drainage holes.

Recommended materials:

  • Clay pots (porous and breathable)
  • Plastic pots (lightweight and affordable)

Ensure containers are sturdy enough to support the growing plant.


Step 4: Prepare the Potting Mix

Ginger thrives in light, loose, and nutrient-rich soil.

Ideal soil mix:

  • 60% quality potting soil
  • 20% coarse sand or perlite for drainage
  • 20% well-rotted compost or aged organic manure

Avoid clay-heavy or waterlogged soil.


Step 5: Plant the Ginger

  • Fill the container with the soil mix, leaving a 2–3 inch space at the top.
  • Place the ginger pieces horizontally with growth buds facing upward.
  • Cover with 1–2 inches of soil.
  • Water gently to settle the soil.

Space ginger pieces 6-8 inches apart if planting multiple in a large container.


Container Ginger Care Essentials


Light Requirements

Ginger prefers:

  • Partial shade or indirect sunlight
  • 4–6 hours of dappled sunlight daily

Avoid harsh afternoon sun, which can scorch leaves. Indoors, a south or west-facing window works well.


Watering

Keep soil consistently moist but never soggy.

Watering tips:

  • Water when the top 1 inch of soil feels dry.
  • Reduce watering in winter when the plant goes dormant.
  • Mist the leaves occasionally for added humidity.

Warning: Overwatering causes root rot — the most common issue for ginger in containers.


Feeding

Feed your ginger regularly for healthy growth:

  • Use a balanced organic liquid fertilizer (like seaweed or fish emulsion) every 4-6 weeks.
  • Add compost or organic mulch every couple of months to enrich soil nutrients.

Temperature

Ideal temperature: 68–86°F (20–30°C).
Move pots indoors or to a greenhouse if temperatures drop below 50°F (10°C).


Mulching

Apply a 2-inch layer of organic mulch (straw, dry leaves, or grass clippings) around the plant:

  • Retains moisture
  • Keeps soil cool
  • Suppresses weeds

Harvesting Ginger in Containers

Ginger takes 8–10 months to mature fully but can be harvested earlier for young, tender rhizomes.

Early Harvest:

After 4–6 months, gently dig around the edges and cut a small section of rhizome. Re-cover the rest to keep growing.

Full Harvest:

When leaves start yellowing and dying back:

  • Stop watering for a week
  • Carefully tip the pot over
  • Shake off excess soil
  • Cut off the leaves and clean the rhizomes

Storing Fresh Ginger

  • Fresh: Store in a cool, dry place for up to 3 weeks.
  • Refrigerated: Wrap in paper towels and store in a zip-lock bag for up to 3 months.
  • Frozen: Peel, chop, and freeze for 6 months or longer.
  • Dried: Slice thinly and dry in a dehydrator or oven.

Propagating New Ginger Plants

After harvesting, you can replant a few healthy rhizome pieces with growth buds to start a new crop. Use the same method as before, and you’ll have a continuous supply of fresh ginger at home.


Common Problems & Solutions

ProblemCauseSolution
Root RotOverwatering, poor drainageUse well-draining soil; reduce watering
Yellowing LeavesExcess sunlight or poor nutritionProvide filtered light; feed compost tea
Aphids / MealybugsWarm, moist conditionsSpray neem oil or soapy water

Can You Grow Ginger Year-Round in Containers?

Yes!

  • In warm regions, keep containers outdoors all year.
  • In colder climates, move indoors during fall and winter.
  • Resume watering and fertilizing in spring.

Ginger goes dormant in winter — the leaves die back, but the rhizome stays alive beneath the soil, ready to regrow in warmer months.


Health Benefits of Fresh Homegrown Ginger

Adding freshly harvested ginger to your diet brings numerous health perks:

  • Boosts immunity
  • Aids digestion
  • Eases nausea
  • Reduces inflammation
  • Relieves muscle soreness
  • Supports heart health

Plus, nothing beats the flavor of freshly picked ginger in teas, stir-fries, curries, and desserts.


Final Thoughts

Growing ginger in containers is a rewarding and beginner-friendly gardening project. With minimal effort, even small-space gardeners can enjoy a steady supply of fresh, organic, and chemical-free ginger at home.

By selecting quality rhizomes, using rich, well-draining soil, providing consistent moisture, and placing your containers in partial shade, you’ll be harvesting tender, aromatic ginger in no time.

So why not give it a try? Pick up a plump piece of ginger from your local market today and start your own mini ginger garden right on your balcony or windowsill!

Pineapple Planting Tips for Beginners: Grow Your Own Tropical Fruit at Home

Pineapple Planting Tips for Beginners: Grow Your Own Tropical Fruit at Home

Growing your own pineapple plant is one of the most rewarding and surprisingly simple gardening projects you can try — even if you’re new to home gardening. With their exotic appearance, spiky green leaves, and juicy golden fruit, pineapples are both a striking ornamental plant and a delicious homegrown treat.

The good news is, you don’t need a farm or a tropical climate to grow pineapples successfully. Even in cooler areas or limited spaces, pineapples thrive in containers and indoors, as long as they get enough warmth and light.

In this detailed beginner’s guide, we’ll share essential pineapple planting tips, from selecting the right fruit to planting, caring for, and harvesting your homegrown pineapples.


Why Grow Pineapples at Home?

Pineapples are a favorite for home gardeners because:

  • They’re easy to grow from store-bought fruit tops (crowns).
  • Perfect for small spaces, balconies, and indoor pots.
  • Require minimal maintenance and infrequent watering.
  • Add a tropical, ornamental charm to any space.
  • Offer the delight of homegrown, sweet fruit after a little patience.

Even better — a single pineapple plant can produce offsets (called pups or suckers) after fruiting, giving you new plants for free!


What You’ll Need to Start Planting

Before you get your hands dirty, gather these basic supplies:

  • 1 fresh, ripe pineapple with healthy, green leaves
  • Sharp kitchen knife
  • Toothpicks (optional)
  • Glass jar or cup
  • Pot (8–12 inches deep) with drainage holes
  • Well-draining potting mix (cactus or succulent mix works great)
  • Sunny, warm spot indoors or outdoors

Beginner-Friendly Pineapple Planting Tips

1. Choose a Healthy Pineapple

Your success starts with selecting a good pineapple. Look for:

  • Bright green, fresh-looking leaves
  • A firm, golden-yellow body
  • Sweet, fruity aroma at the base
  • No signs of rot, mold, or damage on the crown

Avoid: pineapples with brown, wilted leaves or soft, mushy spots.

Pro Tip: Organic pineapples are better since some conventionally grown ones are treated with growth inhibitors to prevent sprouting.


2. Remove the Crown Properly

Hold the pineapple firmly and twist off the leafy top (crown). Alternatively, you can cut the crown with about half an inch of fruit attached, then carefully trim away any remaining fruit flesh to avoid rot.

Important: Peel off the lower 4–6 leaves to expose about an inch of the base stem, which is where roots will form.


3. Let the Crown Dry (Cure)

This step is crucial for preventing fungal infections. Place the trimmed crown in a well-ventilated, shaded area for 2–3 days. The cut area will dry and callous over, protecting it from rot when planted.


4. Root the Pineapple Crown

You have two methods to root your pineapple crown:

Method A: In Water

  • Fill a glass with clean water.
  • Suspend the crown so only the bottom inch touches the water.
  • Place it in a warm, sunny spot.
  • Change the water every 2–3 days.
  • Roots should appear in 2–3 weeks.

Method B: In Soil

  • Plant the cured crown directly into a pot filled with well-draining soil.
  • Bury it up to the first leaves.
  • Water lightly and place in a bright location.

Pro Tip: Water propagation is ideal for beginners because it lets you observe root growth.


5. Choose the Right Pot and Soil

Pineapples hate soggy roots. Use a pot with several drainage holes and a lightweight, fast-draining soil mix.

Ideal soil mix:

  • 50% potting soil
  • 25% sand or perlite
  • 25% compost or coconut coir

Container size: Start with an 8–12 inch deep pot. Move to a bigger one as the plant grows.


6. Give It Plenty of Sunlight

Pineapples are tropical plants and need 6–8 hours of bright, direct sunlight daily. If growing indoors, place the pot by a south or west-facing window.

In cooler regions: Move pots outdoors during warm months and bring them inside before temperatures drop below 60°F (16°C).


7. Water Sparingly

New gardeners often overwater pineapples. These plants prefer slightly dry conditions.

Watering guide:

  • Keep soil slightly moist, not soggy.
  • Water thoroughly when the top inch feels dry.
  • In summer: Once a week.
  • In winter: Every 10–14 days.

Pro Tip: Occasionally pour a little water into the central rosette of leaves, mimicking natural tropical rainfall.


8. Feed Occasionally

Feed your pineapple plant with a balanced liquid fertilizer or organic compost tea every 4–6 weeks during active growing months (spring and summer).

Avoid nitrogen-heavy fertilizers, which encourage leaf growth but delay fruiting.

In winter: Fertilizing is optional since plant growth slows down.


How Long Does a Pineapple Take to Grow?

Growing a pineapple takes patience. On average, it takes 18–24 months for a plant to produce fruit when grown from a crown.

Signs of readiness for fruiting:

  • Plant reaches about 3 feet tall.
  • Central stalk emerges from the rosette, followed by a small purple flower spike.
  • A baby pineapple forms at the top of this stalk.

Harvesting Homegrown Pineapples

The pineapple fruit is ready when:

  • The outer skin turns golden yellow.
  • It gives off a sweet aroma at the base.
  • The fruit feels firm but slightly springy.

To harvest: Grasp the fruit firmly and twist it off.

Bonus: The parent plant will produce new offshoots (pups or suckers) around its base after fruiting. You can separate these to grow more plants!


Common Pineapple Plant Problems and Solutions

  • Root Rot: Avoid overwatering. Ensure good drainage.
  • Mealybugs/Spider Mites: Remove pests with a water spray or neem oil.
  • Slow Growth: Check for adequate sunlight and warmth. Pineapples hate cold, dark environments.

Can Pineapples Be Grown Indoors Year-Round?

Yes — with proper care:

  • Bright, direct sunlight for 6+ hours daily (or use a grow light).
  • Warm temperatures above 65°F (18°C).
  • Occasional fertilizing and careful watering.

They make great indoor houseplants, adding a tropical touch and requiring little maintenance.


Final Thoughts

Growing a pineapple at home is one of the easiest and most enjoyable fruit gardening experiences for beginners. With a simple grocery store pineapple, a pot, and a sunny spot, you can start your own tropical garden adventure.

By following these beginner-friendly pineapple planting tips — from choosing the right fruit and curing the crown to rooting, planting, and caring for your plant — you’ll soon be on your way to a lush, spiky pineapple plant and the joy of homegrown fruit.

Sure, it takes patience, but the reward of slicing into a juicy, homegrown pineapple you nurtured from a grocery store top is worth every day of the wait.

Growing Pineapple at Home: Complete Step-by-Step Guide for Beginners

Growing Pineapple at Home: Complete Step-by-Step Guide for Beginners

There’s something uniquely satisfying about growing your own tropical fruits at home — and few are as charming and rewarding as pineapples. With their spiky green crowns, sweet golden flesh, and tropical flair, pineapples aren’t just delicious — they also make eye-catching houseplants or garden features.

The best part? You don’t need a large backyard or complicated tools to grow pineapples at home. With a simple store-bought pineapple and a bit of patience, you can nurture your own plant, right on your balcony, patio, or sunny windowsill.

In this complete step-by-step guide, we’ll show you how to successfully grow pineapples at home — from selecting the right fruit to rooting, planting, and caring for your plant until harvest.


Why Grow Pineapples at Home?

Pineapples are surprisingly easy to grow with minimal care requirements. Here’s why they’re perfect for home gardeners:

  • Space-saving: Grow them in pots or small containers.
  • Tropical ornamental beauty: Their spiky leaves and form add flair to indoor or outdoor spaces.
  • Low maintenance: Drought-tolerant and hardy once established.
  • Free plants: Regrow new plants from store-bought pineapples.
  • Delicious, homegrown fruit: Sweeter and fresher than anything from a store.

What You’ll Need

Before you get started, gather the following:

  • 1 healthy, ripe pineapple with an intact green crown
  • Sharp knife
  • Glass of water or shallow dish
  • Pot with drainage holes (8-12 inches deep)
  • Well-draining potting mix (cactus or succulent mix works well)
  • Sunny, warm spot (indoors or outdoors)

Step-by-Step Guide: Growing Pineapples at Home


Step 1: Choose the Right Pineapple

Select a ripe, healthy pineapple with:

  • Bright green, fresh-looking leaves
  • No signs of rot or mold
  • Firm body with a fragrant, sweet smell at the base

Avoid fruits with dry, brown, or damaged leaves, as these may not root well.


Step 2: Remove the Crown

Hold the base of the leafy crown firmly and twist it off from the fruit. Alternatively, you can cut the crown off with about half an inch of fruit attached, then carefully trim away any excess fruit flesh, which can rot and cause fungal issues.

Important: Remove a few of the lower leaves to expose about an inch of the stem.


Step 3: Cure the Crown

To prevent rot, let the trimmed crown dry in a shaded, well-ventilated area for 2–3 days. This curing process allows the cut end to heal, reducing the chance of fungal infection when planted.


Step 4: Root the Pineapple Top

You have two rooting options:

Option 1: In Water

  • Place the cured pineapple top in a glass of water, submerging only the bottom stem.
  • Keep it in a sunny, warm location.
  • Change the water every 2–3 days to keep it fresh.
  • Roots should start appearing within 2–3 weeks.

Option 2: In Soil (Direct Planting)

  • Plant the crown directly in a well-draining potting mix.
  • Water lightly.
  • Keep the soil slightly moist, not soggy.

Both methods work, but water propagation allows you to easily monitor root development.


Step 5: Transplant into a Pot

Once roots are about 2 inches long (if started in water), transplant your pineapple crown into a pot with well-draining soil.

Planting tips:

  • Use a pot at least 8-12 inches deep and wide.
  • Bury the crown base up to the first set of leaves.
  • Gently firm the soil and water lightly.

Care Tips for Your Pineapple Plant

Sunlight:

Pineapples love warmth and sunshine. Provide 6–8 hours of bright, direct sunlight daily. If indoors, place your plant near a south-facing window.

Watering:

  • Water sparingly. Let the soil dry out slightly between waterings.
  • Pineapples are drought-tolerant and prefer slightly dry conditions.
  • In hot climates, water once a week.
  • Avoid waterlogging the soil, which causes root rot.

Tip: Occasionally pour water into the central rosette of leaves, mimicking tropical rain.

Fertilizing:

Feed your plant with a balanced liquid fertilizer every 4–6 weeks during spring and summer. Reduce feeding in fall and winter when growth slows.

A slow-release organic fertilizer or compost tea works beautifully too.

Temperature:

Pineapples thrive in temperatures between 65–95°F (18–35°C). If temperatures drop below 60°F (16°C), bring your plant indoors or protect it with a cover.


Common Problems and How to Avoid Them

Root Rot: Caused by overwatering. Always use well-draining soil and pots with drainage holes.

Fungal Issues: Prevent by curing the crown before planting and keeping the plant in a well-ventilated area.

Pests: Watch for mealybugs or spider mites. Remove them with a water spray or insecticidal soap if needed.


When Will It Produce Fruit?

Patience is key. Pineapples grown from crowns typically take 18–24 months to produce a fruit — but it’s worth the wait!

You’ll notice a small flower stalk forming from the center, followed by a baby pineapple.

Pro tip: Expose the plant to ethylene gas (from ripening apples or bananas nearby) to help trigger flowering when the plant is mature.


Can Pineapples Grow Indoors Year-Round?

Yes! Pineapples can live happily indoors as long as they receive:

  • Bright sunlight (a grow light can help during winter)
  • Warm temperatures
  • Proper watering and occasional feeding

They make excellent, exotic houseplants with their dramatic leaves and striking form.


Harvesting Your Homegrown Pineapple

When your pineapple turns golden yellow and smells sweet at the base, it’s ready to harvest.

How to pick:

  • Grasp the fruit firmly.
  • Twist it gently from the stalk.
  • Enjoy fresh, homegrown pineapple — the flavor is often sweeter and richer than store-bought versions.

Bonus: After harvesting, you can use the new crown to start the cycle all over again!


Conclusion

Growing a pineapple at home is an easy, fun, and deeply rewarding project. With minimal equipment, a little patience, and this step-by-step guide, you can enjoy nurturing a tropical plant that brings both visual charm and the promise of sweet, homegrown fruit.

Whether in a backyard garden, sunny balcony, or even on a windowsill, your pineapple plant will flourish with proper care. And when the time comes, the taste of your very own pineapple will be worth every minute of the wait.

Which Country Is the Largest Yarrow Producer in the World?

Which Country Is the Largest Yarrow Producer in the World?

Among the most ancient and versatile herbs known to humankind, Yarrow (Achillea millefolium) holds a remarkable place in both history and horticulture. Celebrated for its delicate, aromatic clusters of tiny flowers and finely divided, feathery foliage, yarrow has served as a medicinal plant, an ornamental garden favorite, and a valuable essential oil source for centuries. But which country leads the world in producing this resilient, healing herb? In this detailed article, we’ll explore the origins, cultivation, global trade, and reveal which nation has emerged as the largest yarrow producer in the world.


An Introduction to Yarrow

Yarrow is a perennial flowering plant native to temperate regions of the Northern Hemisphere, including Europe, Asia, and North America. With over 140 recognized species in the Achillea genus, Achillea millefolium is the most widely cultivated for both medicinal and ornamental purposes.

Known for its:

  • Clusters of white, yellow, pink, or red flowers
  • Fragrant, fern-like leaves
  • Hardiness in poor soils and harsh climates
  • Health benefits including wound healing, fever reduction, and digestive aid

Yarrow has become indispensable in the herbal industry, essential oil markets, and modern natural skincare.


Global Yarrow Production Landscape

While yarrow grows wild across vast areas of Europe, Asia, and the Americas, commercial production has steadily risen to meet the global demand for:

  • Dried herb and aerial parts
  • Yarrow essential oil (notable for its rich blue hue and azulene content)
  • Pharmaceutical and cosmetic preparations
  • Ornamental plants for home and landscape gardens

Today, the major global producers of yarrow include:

  • Bulgaria
  • Romania
  • Hungary
  • Germany
  • Poland
  • United States
  • Canada

However, among these, one country stands out as the undisputed leader in large-scale commercial production.


Bulgaria: The Largest Yarrow Producer in the World

Bulgaria has earned its place as the world’s top producer of yarrow, particularly for the essential oil and medicinal herb industries.

Why Bulgaria Leads:

  1. Ideal Climate and Soil:
    Bulgaria’s temperate climate, fertile plains, and long history of herb farming make it an ideal region for cultivating high-quality yarrow.
  2. Medicinal and Aromatic Plant Industry:
    Alongside famous crops like lavender, rose, and chamomile, Bulgaria has developed extensive farms dedicated to cultivating medicinal plants, including yarrow.
  3. Essential Oil Production Hub:
    Bulgaria is globally recognized for producing some of the finest azulene-rich yarrow essential oil, exported to the cosmetics and aromatherapy industries across Europe, the Middle East, and North America.
  4. Experienced Workforce and Traditional Knowledge:
    Generations of farmers and distillers have passed down the art of harvesting and distilling medicinal herbs, ensuring consistent quality and high yields.
  5. Export Dominance:
    Bulgaria supplies a significant portion of the dried yarrow and essential oil found in global markets, particularly within the European Union and Asia.

Global Yarrow Market Share and Cultivation Statistics

While exact annual tonnage figures for yarrow are difficult to pinpoint due to wild harvesting supplements and private farm records, agricultural trade reports and industry estimates place Bulgaria as contributing roughly:

  • Over 60% of Europe’s total cultivated yarrow biomass
  • More than 50% of the global essential oil production

The largest cultivation areas are concentrated in:

  • Southern Bulgaria
  • The Balkan Mountain foothills
  • The Thracian Lowlands

Yarrow is typically grown on small to medium-sized farms alongside other medicinal plants. Harvesting is done at peak bloom, and immediate processing ensures preservation of its valuable compounds.


Other Notable Yarrow Producing Countries

While Bulgaria leads the way, several other countries contribute meaningfully to global yarrow production:

Romania

Romania ranks second, with abundant natural meadows and cultivated farms producing high-quality yarrow for both medicinal herb suppliers and essential oil distilleries.

Hungary

Hungary maintains a rich tradition of medicinal herb farming. Yarrow is grown primarily in the Pannonian Plain and is a valued crop for local herbal medicine production.

Germany

Germany has historically been a key producer of certified organic and pharmaceutical-grade yarrow. The country emphasizes strict quality control and supplies both domestic and export markets.

Poland

Poland cultivates yarrow extensively, particularly in north-central agricultural regions. Polish yarrow is mainly used in teas, natural remedies, and as an ornamental plant.

United States & Canada

In North America, yarrow grows wild and is also cultivated on small herbal farms. The United States, particularly states like Oregon, Montana, and California, produce yarrow for local natural health markets and small-scale export.


Yarrow in International Trade and Industry

The modern herbal and essential oil industry has driven increased global demand for yarrow, used in:

  • Aromatherapy and massage oils
  • Natural skin care formulations
  • Herbal teas and tinctures
  • Homeopathy and holistic remedies

Bulgaria’s yarrow essential oil is especially prized for its:

  • High azulene content
  • Deep blue color
  • Potent anti-inflammatory and antiseptic properties

This oil is a key ingredient in premium cosmetics and aromatherapy blends worldwide.


Cultivation and Harvesting Practices

Yarrow farming typically involves:

  • Propagation via seeds or root division in spring
  • Cultivation in well-drained, light soils
  • Minimal irrigation, as yarrow is drought-tolerant
  • Harvesting of aerial parts at peak bloom (usually July to August)

For essential oil production, steam distillation is used immediately after harvest to capture volatile oils rich in azulene and other active compounds.


The Future of Yarrow Cultivation

With rising interest in natural, herbal, and organic products, yarrow’s future in agriculture looks promising. Global markets for medicinal herbs and essential oils are forecasted to grow steadily, fueled by:

  • Increased demand for plant-based remedies
  • Expanding natural cosmetics industries
  • Interest in sustainable, chemical-free agriculture

Bulgaria is expected to maintain its lead position, while countries like Romania and Germany expand their production capacities to meet growing European demand.


Final Verdict

So, which country is the largest yarrow producer in the world?
Bulgaria holds the top position, leading the global yarrow industry in both cultivated herb biomass and essential oil production.

Its favorable climate, rich herbal tradition, advanced essential oil processing, and established export channels make Bulgaria the dominant force in global yarrow supply. As herbal remedies and natural skincare products continue to gain popularity, Bulgaria’s role in the yarrow market will only strengthen.

Which Country Is the Largest Coneflower (Echinacea) Producer in the World?

Which Country Is the Largest Coneflower (Echinacea) Producer in the World?

When you stroll through a sunny garden or browse a health food store’s supplement aisle, you’re likely to encounter Coneflowers, scientifically known as Echinacea. Famous for their charming daisy-like blooms and valued for their medicinal properties, coneflowers have become a staple in ornamental horticulture and herbal medicine. But where are most of these beautiful and beneficial plants grown? Which nation holds the title of the largest coneflower producer in the world? In this article, we’ll explore the origins, cultivation, and global trade of coneflowers, ultimately uncovering which country leads the way.


What Are Coneflowers (Echinacea)?

Echinacea, commonly known as coneflower, is a genus of flowering plants native to North America. There are about 9 recognized species, the most popular being:

  • Echinacea purpurea (purple coneflower)
  • Echinacea angustifolia
  • Echinacea pallida

Coneflowers are known for their hardiness, vibrant colors ranging from purple to pink and white, and their distinctive spiny central cone, which attracts bees, butterflies, and other pollinators.

Beyond their beauty, Echinacea has earned global recognition for its immune-boosting, anti-inflammatory, and antioxidant properties, making it one of the world’s most sought-after medicinal herbs.


The Global Market for Coneflowers

Today, coneflowers are cultivated both as ornamental plants and for pharmaceutical and herbal supplement industries. While they naturally thrive in North America, the increasing demand for Echinacea-based supplements, teas, and essential oils has expanded their cultivation to Europe, Asia, and beyond.

Major coneflower producers include:

  • United States
  • Canada
  • Germany
  • India
  • China
  • The Netherlands

Each of these countries contributes to the international Echinacea trade, whether for fresh flowers, dried herbs, extracts, or seeds. However, one country has emerged as the global leader in terms of commercial production and export volume.


India: The Largest Exporter and Leading Global Producer

Surprisingly to some, it’s India that currently holds the top spot as the largest coneflower (Echinacea purpurea) producer and exporter in the world.

Why India Leads:

  1. Expansive Cultivation Areas:
    Over the past two decades, India has rapidly expanded its medicinal plant cultivation, with Echinacea becoming one of its most prominent herbal crops.
  2. Ideal Growing Conditions:
    Echinacea grows well in India’s temperate and subtropical regions, particularly in states like Uttarakhand, Himachal Pradesh, Punjab, and Jammu & Kashmir.
  3. Herbal Medicine Demand:
    As the global market for natural immunity-boosting supplements surged in recent years, Indian growers and herbal pharmaceutical companies increased their investment in cultivating and processing Echinacea for both domestic and international markets.
  4. Cost-Effective Production:
    Competitive labor costs and abundant arable land give India a significant advantage in large-scale herbal cultivation.
  5. Leading Exporter of Echinacea Extracts:
    According to international trade data, India exports more than 50% of the world’s Echinacea extracts and dry herb shipments, making it the largest commercial supplier globally.

Other Major Coneflower Producers

While India dominates in exports, several other countries play significant roles in the global Echinacea market.

United States

The natural home of coneflowers, the United States remains one of the largest producers, particularly for:

  • Ornamental landscaping
  • Cut flower markets
  • Medicinal herb farms

States like Missouri, Kansas, Montana, and North Carolina are major contributors, with farms dedicated to both Echinacea root and aerial parts for herbal supplements.

Canada

Canada is known for high-quality organic Echinacea production, particularly in British Columbia and Manitoba. Canadian growers focus on both bulk export of dried herbs and value-added supplements.

Germany

Germany has a long-standing tradition of herbal medicine and is one of Europe’s largest Echinacea cultivators. German farms primarily grow Echinacea purpurea for pharmaceutical-grade tinctures and extracts, supplying both the domestic and broader EU market.

China

China has rapidly expanded its production of medicinal herbs, including Echinacea, over the last decade. With large-scale cultivation bases and modern extraction facilities, China has become a significant exporter of Echinacea extracts to Asia and North America.


Coneflower Production by Market Segment

The coneflower industry serves multiple markets:

  • Ornamental horticulture: Garden plants and cut flowers
  • Herbal supplements: Dried roots and aerial parts for immunity-boosting remedies
  • Herbal teas and tinctures
  • Essential oils and natural skincare

India’s leadership primarily pertains to herbal medicine and extract exports, while countries like the USA, Germany, and Canada excel in supplying fresh and dried plants for local and regional consumption.


Estimated Global Market Share

CountryMarket FocusEstimated Global Share
IndiaMedicinal extract & dry herb exports50-55%
United StatesOrnamental, supplements (domestic focus)20%
CanadaOrganic Echinacea & herbal products10%
GermanyPharmaceutical-grade extracts7-8%
ChinaExtract production for Asian markets5%

The Rise of Coneflower Demand

The demand for Echinacea has grown sharply in recent years, driven by:

  • Rising interest in natural immunity-boosting products
  • Increased popularity of organic gardening and landscaping
  • Expansion of the global herbal supplement market, expected to surpass USD 150 billion by 2026

Countries like India have capitalized on this growth by enhancing their cultivation techniques, expanding organic certifications, and improving export logistics.


Future of Coneflower Production

As global demand for herbal supplements continues to rise, India is expected to maintain its leading position, while North American and European producers focus on:

  • Specialty organic products
  • High-grade extracts for pharmaceutical use
  • Sustainable, eco-friendly cultivation

Technological advancements in greenhouse farming and plant breeding will likely enhance yields and expand cultivation into new regions.


Final Verdict

Which country is the largest coneflower producer in the world?
India currently leads the global coneflower market, particularly in the export of medicinal Echinacea extracts and dried herbs.

While countries like the United States, Canada, and Germany maintain strong domestic and regional markets for ornamental and pharmaceutical-grade Echinacea, India’s expansive herbal farming sector and cost-effective production give it a dominant edge in global trade.

As natural health products continue to soar in popularity, India’s coneflower cultivation is poised for even greater growth in the years ahead.

Which Country Is the Largest Camellia Producer in the World?

Which Country Is the Largest Camellia Producer in the World?

The Camellia is one of the world’s most admired flowering plants — cherished not only for its stunning ornamental blooms but also for its economic importance in the form of tea leaves and edible oil. This versatile plant genus has a rich cultural history, medicinal uses, and plays a crucial role in several agricultural economies.

But have you ever wondered which country is the largest producer of Camellias in the world? The answer is clear and undisputed: China.

This article will guide you through the story of Camellias, their different uses, global production patterns, and why China holds its position as the global leader in Camellia cultivation.


What Are Camellias?

Camellia is a genus of flowering plants in the family Theaceae, native to eastern and southern Asia, particularly China, Japan, Korea, Vietnam, and India. There are around 200–300 species, many of which are grown for their ornamental flowers, while others are cultivated for tea leaves or oil production.

The three most commercially important types of Camellias are:

  • Camellia sinensis: The famous tea plant whose leaves and leaf buds are used to produce green, black, white, and oolong teas.
  • Camellia oleifera: Grown for its seeds, which produce high-quality edible oil known as Camellia oil or tea seed oil.
  • Camellia japonica and Camellia sasanqua: Popular ornamental species prized for their showy, rose-like flowers.

Global Camellia Cultivation

Camellias are cultivated across several countries for various purposes:

  • Tea production: China, India, Sri Lanka, Kenya, and Vietnam
  • Edible oil production: Primarily China and parts of Japan
  • Ornamental purposes: Japan, the United States, the United Kingdom, Italy, Spain, New Zealand, and Australia

While many countries grow Camellias ornamentally, China leads by a vast margin in both commercial and ornamental Camellia cultivation.


Why Is China the Largest Camellia Producer in the World?

1. Ideal Climate and Geography

China’s mild, subtropical climate with abundant rainfall, acidic soils, and warm temperatures is perfect for cultivating Camellias, especially in regions like:

  • Hunan
  • Jiangxi
  • Guangxi
  • Fujian
  • Yunnan

These areas provide the right environment for both tea Camellia plantations and oil Camellia farms.


2. Ancient Cultivation Tradition

Camellia cultivation has been practiced in China for over 2,300 years. The country is the birthplace of tea culture and has a long history of using Camellia oil in cooking, medicine, and cosmetics.

The deep-rooted cultural and historical connection ensures the continuous development and refinement of Camellia cultivation techniques.


3. Massive Scale of Production

  • Camellia sinensis (Tea Camellia):
    China is the world’s largest tea producer and exporter, producing over 3 million metric tons of tea annually. The majority of this tea comes from Camellia sinensis plantations spread across various provinces.
  • Camellia oleifera (Oil Camellia):
    China is also the largest producer of Camellia oil in the world, accounting for over 95% of global production. In recent years, China harvested over 2.6 million tons of Camellia seeds annually, with the government actively promoting the expansion of oil Camellia plantations.
  • Ornamental Camellias:
    China boasts the world’s largest collection of ornamental Camellia varieties, cultivating hundreds of unique species and hybrids for both domestic gardens and export markets.

4. Government Support and Investment

The Chinese government recognizes Camellia as an economically valuable and environmentally sustainable crop. It has invested heavily in:

  • Developing high-yield Camellia cultivars
  • Expanding plantation areas
  • Supporting research institutions
  • Promoting Camellia oil and tea consumption domestically and abroad

The official goal is to expand Camellia oil plantations to over 6 million hectares (approx. 14.8 million acres) by 2025.


Uses and Economic Importance of Camellias

Camellia sinensis (Tea Production)

The leaves of this plant produce:

  • Green Tea
  • Black Tea
  • White Tea
  • Oolong Tea

Tea from Camellia sinensis is not only culturally significant in China but also a major agricultural export, contributing billions to the national economy.


Camellia oleifera (Edible Oil)

Camellia oil, also known as tea seed oil, is highly prized for:

  • Its light texture
  • High antioxidant content
  • Being rich in monounsaturated fats (oleic acid)
    (similar to olive oil)

It’s commonly used in cooking, skincare, haircare, and traditional medicine.


Ornamental Camellias

China’s diverse Camellia cultivars feature flowers in various shades of red, pink, white, and yellow. They are cultivated for:

  • Garden landscaping
  • Festival displays
  • Export to Europe, America, and Southeast Asia

Other Camellia-Producing Countries

While China dominates, other countries play supporting roles:

Japan

Renowned for cultivating Camellia japonica and Camellia sasanqua, Japan also produces small amounts of tea and Camellia oil. The Camellia is a beloved flower in Japanese culture and features prominently in literature, art, and cosmetics.


India

India is the second-largest tea producer globally, with vast Camellia sinensis plantations in:

  • Assam
  • Darjeeling
  • Nilgiris

Kenya

Kenya ranks among the top five global tea producers, relying heavily on Camellia sinensis plantations for its economy.


Vietnam

A rapidly growing player in the tea market, Vietnam cultivates Camellia sinensis for both domestic use and export.


Challenges Facing Camellia Production

Like any agricultural sector, Camellia cultivation faces its share of challenges:

  • Climate change affecting flowering and yield patterns
  • Pests and diseases like tea blight and leaf spot
  • Market price fluctuations
  • Hybridization risks in ornamental Camellia species

China is addressing these with modern breeding programs, integrated pest management, and sustainable farming practices.


Key Production Statistics

Camellia ProductLeading ProducerGlobal Share
Tea (Camellia sinensis)China~35–40%
Camellia Oil (Camellia oleifera)China~95%
Ornamental CamelliasChina, JapanMajority

Conclusion

Which country is the largest Camellia producer in the world?

Undoubtedly, China. From tea plantations to oil farms and ornamental gardens, China leads the globe in cultivating Camellias. Its natural advantages, centuries of expertise, government support, and global demand make it the undisputed king of Camellia production.

While other nations like India, Japan, Kenya, and Vietnam contribute to global tea and ornamental Camellia cultivation, none come close to matching China’s scale, diversity, or economic impact.

As demand for natural oils, specialty teas, and ornamental flowers continues to rise, China’s Camellia industry is poised for even greater global influence in the years ahead.

Which Country Is the Largest Bluebell Producer in the World?

Which Country Is the Largest Bluebell Producer in the World?

Bluebells are among the most beloved wildflowers in the world, famous for transforming woodlands into breathtaking carpets of blue and violet every spring. Their delicate, bell-shaped blooms and sweet fragrance have made them a favorite symbol of renewal and natural beauty in many cultures.

But beyond their ornamental appeal, have you ever wondered which country produces the most bluebells? While these flowers grow naturally in several parts of the world, one country stands out as the largest and most significant stronghold for native bluebells: the United Kingdom.

In this article, we’ll explore the story of the bluebell, its ecological importance, global distribution, why the UK dominates in bluebell coverage, and the conservation efforts to protect these delicate plants for generations to come.


A Brief Introduction to Bluebells

Bluebells belong to the genus Hyacinthoides, with several species native to parts of Europe and the Mediterranean. The most famous and widely recognized species is the native British bluebell (Hyacinthoides non-scripta), known for its deep blue, nodding flowers and strong, sweet scent.

There are three main species commonly referred to as bluebells:

  • Hyacinthoides non-scripta (native British bluebell)
  • Hyacinthoides hispanica (Spanish bluebell)
  • Hyacinthoides × massartiana (a hybrid of the two)

These flowers thrive in moist, shaded woodlands and hedgerows, typically blooming from mid-April to late May.


Where Do Bluebells Grow Naturally?

Bluebells are native to:

  • The British Isles
  • Western Europe (including northern France, Spain, Belgium, and parts of the Netherlands)
  • Portugal
  • Small sections of western Germany

While they grow naturally in these regions, none rival the density, spread, and ecological importance of bluebells in the United Kingdom.


Why Is the United Kingdom the Largest Bluebell Producer in the World?

1. Ideal Growing Conditions

The UK’s mild, moist climate and extensive network of ancient woodlands provide perfect conditions for bluebells to thrive. These flowers prefer shaded environments under deciduous trees, where they bloom before the forest canopy fully develops.

2. Rich Ancient Woodland Heritage

The United Kingdom has one of the highest concentrations of ancient woodlands in Western Europe — woodlands that have existed for several centuries. Bluebells are often considered an indicator species of ancient woodlands, meaning their presence suggests that the area has been continuously forested for hundreds of years.

In spring, these forests — such as those in Surrey, Kent, Sussex, and the Lake District — become home to vast, uninterrupted carpets of native bluebells.

3. Strong Cultural and Conservation Commitment

In the UK, bluebells are more than just wildflowers — they are a cherished part of the national landscape and cultural identity. Because of their importance, the British bluebell (Hyacinthoides non-scripta) is protected under UK law. It is illegal to dig up bluebells in the wild or trade in wild-collected bulbs without proper licenses.

Conservation charities like the Woodland Trust and Plantlife actively protect and manage bluebell-rich woodlands, ensuring that these flowers remain a natural treasure for future generations.

4. Global Share of Bluebells

The UK is estimated to be home to over 50% of the world’s bluebell population. Nowhere else on Earth do bluebells grow with such abundance and coverage as they do in Britain’s ancient woodlands.


Global Bluebell Production Overview

CountryRole in Bluebell Growth
United KingdomLargest concentration of native Hyacinthoides non-scripta, covering over half of the world’s population
Spain & PortugalNative range of Hyacinthoides hispanica (Spanish bluebell)
France, Belgium, NetherlandsScattered wild and ornamental bluebell growth
United States & CanadaNon-native; cultivated ornamentally in gardens

While bluebells are admired globally, the UK remains the heartland of native bluebell woodlands.


Ecological Importance of Bluebells

Bluebells play a vital role in woodland ecosystems:

  • Early-season nectar source for pollinators like bees, butterflies, and hoverflies.
  • Help form a dense spring ground cover, which suppresses competing weeds and helps maintain soil moisture.
  • Support native biodiversity by forming part of a complex woodland ecosystem.

Bluebells in British Folklore and Culture

In British folklore, bluebells were often referred to as “fairy flowers.” It was once believed that fairies used bluebell glades to summon each other or cast spells on unwary humans who ventured into the woods.

In literature and poetry, bluebells have symbolized humility, gratitude, and everlasting love. Writers like Gerard Manley Hopkins and Emily Brontë immortalized the charm of bluebell woods in their works.

Today, visiting bluebell woods in spring is a beloved British pastime, with families and nature lovers flocking to see these ephemeral displays.


Threats to Native Bluebells

Despite their beauty and popularity, native bluebells face several threats:

Trampling and Habitat Loss

Uncontrolled footfall in bluebell woods can damage the delicate plants, as bluebells are slow to recover once disturbed. Habitat loss due to urban development has also reduced some bluebell populations.

Hybridization

Introduced Spanish bluebells (Hyacinthoides hispanica) and their hybrids pose a significant threat by cross-breeding with native species, leading to the genetic dilution of pure Hyacinthoides non-scripta.

Climate Change

Changing weather patterns may alter the flowering times and growing conditions for bluebells, potentially affecting their long-term survival.


Conservation Efforts to Protect Bluebells

The UK has implemented several measures to protect its bluebell heritage:

  • Legal Protection: Under the Wildlife and Countryside Act 1981, it is illegal to uproot wild bluebells or trade them without proper authorization.
  • Ancient Woodland Protection: Conservation organizations work tirelessly to safeguard ancient woodlands from development and destruction.
  • Public Awareness Campaigns: Initiatives encourage responsible visiting of bluebell woods, urging visitors to stick to marked paths to avoid trampling the flowers.

Popular Bluebell Woods to Visit in the UK

If you’re hoping to experience the beauty of a bluebell carpet in full bloom, these are some of the UK’s best-loved locations:

  • Ashridge Estate, Hertfordshire
  • Hallerbos (the Blue Forest), Belgium — the only non-UK site of comparable bluebell displays
  • Micheldever Woods, Hampshire
  • The Lake District
  • Pembrokeshire Coast National Park, Wales
  • Kew Gardens, London

Conclusion

So, which country is the largest bluebell producer in the world?

Without question, the United Kingdom holds that title. With over half of the global population of native bluebells within its borders, the UK’s ancient woodlands offer an irreplaceable refuge for these stunning flowers. Their ecological, cultural, and aesthetic significance has made them a cherished symbol of British natural heritage.